One of the wonderful things about SketchFab is that it conveniently lets us embed 3D objects in a way most convenient for our specific purposes. In this case I am going to embed our mystery vase and, for the first time, embed a second vase uploaded by a different user to see how our objects compare and contrast.
Here is the second vase that was captured and uploaded by Kalen J. Scott:
There ae many similarities such as the shape and basic colors used. But, there are also distinct differences in the apparent complexity of the paintings. While students could find both similarities and differences using 2D visualization, they become even more apparent and useful when the vases are viewed in 3D. Not only can ALL sides be viewed; but, the SketchFab viewer allows the student to zoom in for more detailed comparisons.
One of the things that immediately strikes me is that while the paintings vary widely in terms of details. But, the basic shape of the vases is very close. This begs the question, are the potter and the painter different persons? Did one potter feed vases off to a group of painters, with individuals within the group having different levels of skills or different assignments for creating works having different values? If the differences relate to skill levels, what are the defining characteristics of those different skill levels? If the differences related to the goal of creating vases having different price levels, how might each vase be viewed by a perspective buyer and used in a household?
The questions are endless once we have the benefit of viewing each artifact side by side and can choose our own points of comparison for examining each feature in whatever level of detail that our curiosity demands. And, the privilege of each teaching is to be the mentor that encourages that curiosity to continually grow, however incrementally.
SketchFab is an amazing tool. And, for me, it is a tool that provides me with a cherished link to special people of the past who created something they viewed as simply utilitarian and temporary; but, we know as timeless reflections of their life and work. The more I browse the 3D visualizations of antiquities on SketchFab, from a wide variety of cultures and time periods, the more I want to know the people and customs behind them,
I love it!
Saturday, June 30, 2018
Wednesday, June 27, 2018
Mystery Vase #4: Using SketchFab for Deeper Inspection
Once we have an actual 3D model created, whether created from a 3D scanner or a photogrammetry application like 3DF Zephyr, we need some means for our students to fully explore the model.
Fortunately, there is a wonderful solution brought to us called SketchFab. Once uploaded to SketchFab, not only can our students see it in full rotational view; but, students all over the world can examine it as well. Moreover, the SketchFab platform even allows us to embed their engine into blogs like this.
Pretty cool!
But, now let's see how this new way to view our mystery vase can help us develop better observational skills. For instance, this vase appears to have been reconstructed from several pieces. Can you find the glued seams and, if so, can we determine how many pieces were found and glued together for this reconstruction.
Next, we might move on to seeing if we can discover the painting technique used to decorate this piece. What features are painted? And, which are not? What does this seem to say about the skill of the painter.
As is plain to see, having the ability to roll the object around AND zoom in on particular features is amazingly fun and productive!
In future posts we will compare this vase to other scanned vases purportedly from 300-400BC to see if this vase fits into that time period. It's actually tougher to determine than one might think; but, that's the fun of the hunt!
NOTE: we need to point out that SketchFab is new to us. So, as we learn more about how to get the most out of it, we will share that information with you. The goal is for ALL of us to get better using the tools that can help change the lives of at-risk students. We are VERY excited by the potential.
Thursday, May 31, 2018
Mystery Vase 3: Falling in Love with 3DF Zephyr
The Quest continues; but, this time in a surprising new direction with an entirely new product to me.
Last week we had the pleasure of hosting 6 selected cadets at our 3D ThinkLink Lab Immersion Class. The cadets joined us from Youth Challenge academies from 3 states. In the four days they were with us they explored a variety of 3D visualization techniques. These included 360 degree video rotation and 3D scanning using 2 different scanners and 3 different scanning applications.
Here is a sample of just some of their accomplishments. Cappasity Platform
We will fully discuss their experiences in a later post; but, first I want to discuss something we did NOT have at that time. And, that is a wonderful product called 3DF Zephyr. The smaller of the two in this image is a 3D object created from the larger object using 3DF Zephyr and partially printed on a Z450 full-color printer.. Unfortunately, the printer is prone to errors in mid-print.
But, even a partial print has its uses. Note how both the OUTSIDE and the INSIDE were faithfully captured by 3DF Zephyr!
As we have said, 3D Visualization exists in many different formats that delivers a 3D experience at different levels. All are useful when trying to focus on developing observational skills. But, the real power begins with the creation of a 3D object that is viewable in ever direction. 3D scanners can create these types of objects, as can design programs. But, programs are hard to learn and scanners have their own set of challenges. Both are well worth pursuing; but, what I am about to show you is a method that has a great deal of promise for an easier way to bring 3D objects to life.
My first experience with trying to turn 2D images into 3D objects was in 2011 with an Autodesk product called 123Catch. While it showed promise, it produced less than spectacular results. Autodesk discontinued the product and replaced it with ReCap 360. Here is a blog article I posted in 2012 that demonstrated 123Catch using a toy firetruck.
123Catch 2D to 3D with Fire Truck
As you can see from the above demo, the concept was promising though the results were poor.
It's been a long time since I revisted 2D to 3D and things have REALLY changed! I've created a short video that demonstrates my attempt to create a 3D object from a series of 2D photos of the Mystery Vase. have to warn you that I am guilty of using the term "AMAZING!" in super abundance in this video; but, there are no better words to describe my whole experience using 3DF Zephyr. And, especially so when the final mesh was revealed.
As is apparent, I am a real fan. In the next few weeks, months and years I hope to present this marvelous tool in dozens of tutorial videos discussing how it can be used to teach observational skills in every classroom subject to demonstrate clearly that 3D goes well beyond STEM in education.
But, on a personal note, working with the vase in 3DF Zephyr had a profound affect on me. The process of checking the masking on each image had a very pleasant by-product. I think of myself as a person that instinctively loves to observe things in detail. But, going through each image making sure that the aauto-masking features didn't miss anything, I began to develop a deeper appreciation for the person(s) that created and painted this small little artifact. There is something innocent and charming about it that became more and more apparent as I wokrf through the images. By the time I saw the final rendered object I was in awe of the 3DF Zepher team and my little vase. Then, the ironly hit me. Here I was... bringing a possibly ancient Italian artifact new life in the form of a vibrant new 3D object for anyone to see and print using the work of modern Italian artists that created one of the pleasant programs I have ever used.
That's pretty cool.
Last week we had the pleasure of hosting 6 selected cadets at our 3D ThinkLink Lab Immersion Class. The cadets joined us from Youth Challenge academies from 3 states. In the four days they were with us they explored a variety of 3D visualization techniques. These included 360 degree video rotation and 3D scanning using 2 different scanners and 3 different scanning applications.
Here is a sample of just some of their accomplishments. Cappasity Platform
We will fully discuss their experiences in a later post; but, first I want to discuss something we did NOT have at that time. And, that is a wonderful product called 3DF Zephyr. The smaller of the two in this image is a 3D object created from the larger object using 3DF Zephyr and partially printed on a Z450 full-color printer.. Unfortunately, the printer is prone to errors in mid-print.
 |
| 3DF Zephyr Capture and Partial Print |
But, even a partial print has its uses. Note how both the OUTSIDE and the INSIDE were faithfully captured by 3DF Zephyr!
 |
| 3DF Capture - Partial Print from the inside view |
As we have said, 3D Visualization exists in many different formats that delivers a 3D experience at different levels. All are useful when trying to focus on developing observational skills. But, the real power begins with the creation of a 3D object that is viewable in ever direction. 3D scanners can create these types of objects, as can design programs. But, programs are hard to learn and scanners have their own set of challenges. Both are well worth pursuing; but, what I am about to show you is a method that has a great deal of promise for an easier way to bring 3D objects to life.
My first experience with trying to turn 2D images into 3D objects was in 2011 with an Autodesk product called 123Catch. While it showed promise, it produced less than spectacular results. Autodesk discontinued the product and replaced it with ReCap 360. Here is a blog article I posted in 2012 that demonstrated 123Catch using a toy firetruck.
123Catch 2D to 3D with Fire Truck
As you can see from the above demo, the concept was promising though the results were poor.
It's been a long time since I revisted 2D to 3D and things have REALLY changed! I've created a short video that demonstrates my attempt to create a 3D object from a series of 2D photos of the Mystery Vase. have to warn you that I am guilty of using the term "AMAZING!" in super abundance in this video; but, there are no better words to describe my whole experience using 3DF Zephyr. And, especially so when the final mesh was revealed.
As is apparent, I am a real fan. In the next few weeks, months and years I hope to present this marvelous tool in dozens of tutorial videos discussing how it can be used to teach observational skills in every classroom subject to demonstrate clearly that 3D goes well beyond STEM in education.
But, on a personal note, working with the vase in 3DF Zephyr had a profound affect on me. The process of checking the masking on each image had a very pleasant by-product. I think of myself as a person that instinctively loves to observe things in detail. But, going through each image making sure that the aauto-masking features didn't miss anything, I began to develop a deeper appreciation for the person(s) that created and painted this small little artifact. There is something innocent and charming about it that became more and more apparent as I wokrf through the images. By the time I saw the final rendered object I was in awe of the 3DF Zepher team and my little vase. Then, the ironly hit me. Here I was... bringing a possibly ancient Italian artifact new life in the form of a vibrant new 3D object for anyone to see and print using the work of modern Italian artists that created one of the pleasant programs I have ever used.
That's pretty cool.
Thursday, May 17, 2018
Mystery Vase 02: Viewing in Cappasity
While seeing the Mystery Vase in a rotating ideo is helpful, it can't beat actually being in control of the rotation when it comes to being able to really pay attention to the details of the object. We can add this capability by using a wonderful platform called Cappasity. I has turned our standard video into a 360 degree view that we can control. As, importantly, it allows us to zoom and pan on the object to get an up-close view to truly enhance our observational experience.
Please come check back to this page as more will be added as we reflect on the best ways to use this powerful tool. We'll also explore how we can improve on the basic video underlying this Cappasity 360 view. The goal will be to remove, as much as possible, any reflections that get in the way of our being able to see each detail without distraction.
But, even with the current reflections, new details are emerging that might help us to decipher some clues that could tell us if it's of recent or ancient origins. To help us deveope our observational skills, we'll explore details in the form of a series of questions or exercises. Here is the first:
How does this 360 degree view help us better determine the overall condition of the object?
The best way to walk through this adventure is to become involved. It would be great to see your responses to the questions posed in the comment section of each post.
HINT: Try viewing this page on your phone or tablet. The zoom capabilities with a touch screen interfqce are amazing!
Stay tuned... more to come!
Monday, May 7, 2018
Mystery Vase 01: Introduction to Observation
Our goal is to demonstrate how 3D visualization can be helpful in every subject area and every classroom. In particular, we want to demonstrate how we can develope better observational skills using 3D visualization.
Perhaps, a fun way to begin our quest is to introduce a family mystery and seek to solve that mystery using 3D visualization tools.
The Mystery Vase - Background
The vase we are using for this demonstration was inherited by my father-in-law. Both the husband and wife of the family from which it was inherited were educators. Henry Draper was a superintendent of the Washington, DC school system and his wife, Elizabeth Draper was a school principle. During the summers, they would organize trips for teachers. Hentry Draper's obituary states that he made over 27 trips to Europe. He died in 1945 and she passed away in 1979;
They adoped a son, Richard, who became an artist.
An Internet Search
Before revealing the vase in question, we'll first do an internet search of known ancient Italian vessels.
LINK - GOOGLE SEARCH OF IMAGES
This is a typical example:
The Mystery Vase - Still Image
Now, let's take a look at the Mystery Vase. If you double-click on the vase you can view it in full resolution.
While the vase appears to be old and the Draper's did travel to Europe many times, including Naples just as the first World War began, our search of images of ancient vases from Italy shows much more ornate designs with finer detail than this one. In fact, this looks a bit crude by comparison. And, it only shows a head, not a full body as do the others. So....
This is the mystery we will try to solve. And, we will do so using 4 different ways of viewing the vase:
Observation Level 01: Still Imaging
Exploring the image above, see what observations you can make that argue for the vase being genuinely old or a modern creation made to look old. In particular, pay attention to the craftsmanship and detail that supports either finding. If presenting this question to a class, having students come up with at least 5 observations arguing for each conclusion might be a great start toward solving the mystery. So, let's try that exercise for ourselves.\
Observation Level 02: Standard Video
For this opening article, we'll add another observational tool. Here is a video of the vase spinning on a turntable. For the best use of this observational too, try the Full-Screen view.
What we have added by looking at the vase using video is a full 360 degree view. We're not limited to a single perspective. Again, to help us hone our observational skills, let's try to come up with 5 additional observations arguing for each conclusion or refining the initial observations.
Being able to see the object from all sides is very helpful; but, we can't control the spin with normal video. We can't stop and ponder a particular view. And, that is where Cappasity comes into play.
In the next blog article, we will demonstrate how using Cappasity's ability to control our 360 degree 3D view of the vase improves our observational opportunities. And, we'll discuss what it takes to create a video that makes a good Cappasity capture.
The mystery continues... Stay tuned!
Perhaps, a fun way to begin our quest is to introduce a family mystery and seek to solve that mystery using 3D visualization tools.
The Mystery Vase - Background
The vase we are using for this demonstration was inherited by my father-in-law. Both the husband and wife of the family from which it was inherited were educators. Henry Draper was a superintendent of the Washington, DC school system and his wife, Elizabeth Draper was a school principle. During the summers, they would organize trips for teachers. Hentry Draper's obituary states that he made over 27 trips to Europe. He died in 1945 and she passed away in 1979;
They adoped a son, Richard, who became an artist.
Before revealing the vase in question, we'll first do an internet search of known ancient Italian vessels.
LINK - GOOGLE SEARCH OF IMAGES
This is a typical example:

Now, let's take a look at the Mystery Vase. If you double-click on the vase you can view it in full resolution.
 |
| Mystery Vase |
While the vase appears to be old and the Draper's did travel to Europe many times, including Naples just as the first World War began, our search of images of ancient vases from Italy shows much more ornate designs with finer detail than this one. In fact, this looks a bit crude by comparison. And, it only shows a head, not a full body as do the others. So....
- Is the inherited vase a genuine ancient artifact?
- Is it really old or simply made to look old?
- Is it the work of a modern budding artist who was exposed to actual ancient art?
This is the mystery we will try to solve. And, we will do so using 4 different ways of viewing the vase:
- Still Imaging
- Standard Video
- 3D 360 degree visualization that the viewer can control using the Cappasity Platform
- 3D Object capture with full control in all axis directions using a 3D viewer.
Observation Level 01: Still Imaging
Exploring the image above, see what observations you can make that argue for the vase being genuinely old or a modern creation made to look old. In particular, pay attention to the craftsmanship and detail that supports either finding. If presenting this question to a class, having students come up with at least 5 observations arguing for each conclusion might be a great start toward solving the mystery. So, let's try that exercise for ourselves.\
Observation Level 02: Standard Video
For this opening article, we'll add another observational tool. Here is a video of the vase spinning on a turntable. For the best use of this observational too, try the Full-Screen view.
What we have added by looking at the vase using video is a full 360 degree view. We're not limited to a single perspective. Again, to help us hone our observational skills, let's try to come up with 5 additional observations arguing for each conclusion or refining the initial observations.
Being able to see the object from all sides is very helpful; but, we can't control the spin with normal video. We can't stop and ponder a particular view. And, that is where Cappasity comes into play.
In the next blog article, we will demonstrate how using Cappasity's ability to control our 360 degree 3D view of the vase improves our observational opportunities. And, we'll discuss what it takes to create a video that makes a good Cappasity capture.
The mystery continues... Stay tuned!
Friday, April 20, 2018
The Power of 3D to Motivate
We have yet to see all the ways in which 3D technologies, including 3D visualization, design and printing will ultimately influence learning. But, having taught at-risk students 3D design and printing for the past 5 years it is clear to me that 3D is a powerful motivating force in changing student's attitudes about their abilities and desire to learn.
While my past blogs have focused on 3D design and printing, this blog will add the powerful dimension of 3D visualization to teach and enhance observational skills. In particular, we want to explore the application of 3D visualization to enhance motivation and sharpen the focus of students across all classroom subject areas. Of course, it's understood that STEAM related classes can benefit by 3D. But, we'll go beyond these areas to explore ways to use 3D technologies in history, language arts and other non-STEAM subject areas.
CORE GOAL: ENHANCED OBSERVATIONAL SKILLS
Some people see and other SEE! Some people hear and others HEAR! While some of these differences might be genetic, every one of us can learn the skills that it takes to turn seeing into SEEING and hearing into HEARING.
When I taught science or drama to middle school students I knew that very few of them would become scientists or great actors. But, I knew that all of them could learn to see more of life around them and, in doing so, would grow to love science and/or appreciate the skills of a great film director. So, my primary focus was for them to learn the skill of observation. And, it worked just as I had hoped. The science students began paying attention to every detail of the simplest rock or leaf and the drama student's performances came alive with added nuances gleaned from closely observing mannerisms we usually fail to see.
The path from seeing to SEEING is not easy or instant. It's amazing how we resist real in depth observation. But, if mentors are patient and persistent, there comes a time when, like a light bulb, a switch is turn on and the value of the effort is fully realized. As a teacher, watching this transformation is probably our greatest reward.
So, the first goal of this blog is to explore ways 3D can encourage and enhance student's learning experience in ALL subject areas.
CORE GOAL: UNLOCK THE POTENTIAL OF AT-RISK STUDENTS
Up to the present, 3D technologies being used in schools have mostly been focused on the high-achiever. Printers are expensive, twitchy and slow. And, it is thought that serious 3D design applications are difficult to learn for both educator and students.
But, from my work with The YouthQuest Foundation, I know for a fact that learning 3D design and printing has had enormous benefits in the lives of the at-risk young people participating in the programs we serve. It is literally life changing.
I wish all at-risk students had access to 3D design applications and 3D printers. But, for a variety of factors this goal will be a long time coming. But, there are less expensive ways to use the power of 3D to teach life lessons to at-risk young people and we want to find and demonstrate them.
3D VISUALIZATION "POPS"!
Photographers sometimes use the term "Pops" to describe a particularly vivid photo. Here is an example.
3D can do the very thing when it comes to DETAILS. Nothing demonstrates this as well as Brian Valentine's (known as LordV) wonderful "cross-eye" photography. Before we had VR glasses, we had "cross-eye" photography. The photographer takes a picture and then moves slightly left or right to take another picture. They then combine the images side-by-side.
To see the resulting 3D image, the viewer focuses on the image while crossing their eyes. Some find easy and others cannot do it at all. But, for those that are successful, the 3D image suddenly pops into place and the added detail is absolutely stunning.
If you find this technique interesting, check out Brian's galleries for hundreds of images of flowers and insects taken in his garden. He is a hero among macro photographers.
https://www.flickr.com/photos/lordv/albums
If you had trouble getting the 3D effect, this tutorial may help. And, if you have a virtual reality headset that works with side-by-side images you can use those to view these 3D images. While 3D still imaging is powerful, it is just the tip of the 3D iceberg. There is a lot more to come.
EXPLORATION USING THE CAPPASITY PLATFORM
To begin our 3D visualization adventure, we have chosen to use a platform called Cappasity.
http://www.cappasity.com
While the best known application for using the Cappasity platform is to present products for sale, we are convinced that this powerful tool has an important place in enhancing the educational experience of our at-risk students.
This platform provides the means to present 3D content. It's purpose is to capture an object with a series of images that can be presented on two levels. The first level is full 360 degree rotation 3D visualization under the control of the viewer. Here is a page that presents some toys that can be rotated 360 degrees. Double Click on an image to zoom in and out.
https://cappasity.com/toysrus/
A gallery of images is available here.
https://cappasity.com/gallery/
The second level is as a VR, or Virtual Reality, experience.
It's obvious that the Cappasity platform is highly scalable. But, we'll start with the basics. And, that means learning how to capture for 360 rotation and for 3D printing. For this, we will be using two different programs developed by the Cappasity team. Only one of these programs can exist on a single computer, so which one you chose will depend on whether or not you have a compatible RealSense Depth scanner.
Easy 3D Scan
Easy 3D Scan captures 3D visualization content using video. If you have a compatible Canon SLR it will automatically drive the camera for the capture. But, video from just about any source can be used.
Currently, Easy 3D Scan does not capture objects to be printed on a 3D printer.
Easy 3D Scan for Intel RealSense
We have been using Sense and Intel RealSense depth cameras for some time with our 3D design and printing students.
While this progran is no longer being developed into the future, it is still currently available as a free download and is THE best software for capturing 3D objects with a RealSense depth camera that we have tested. We don't know how long this software will be available; but, while it is, we plan to make full use of it because it allows us to create 3D objects that can be printed as well as viewed.\
It earned its "Easy" name at the USA Science & Technology Festival where our at-risk students taught hundreds of children how to scan real objects into 3D images using the Sense2 Scanner and Cappasity!
To summarize, what makes the Cappasity platform unique is that a variety of input sources can be used to create 3D visualizations. A series of still photographs or a video can be used to create 360-degree rotation visualizations. But, Cappasity can also create objects than be printed on a 3D printer using a RealSense based 3D scanner.
I'm really looking forward to this great new adventure!
While my past blogs have focused on 3D design and printing, this blog will add the powerful dimension of 3D visualization to teach and enhance observational skills. In particular, we want to explore the application of 3D visualization to enhance motivation and sharpen the focus of students across all classroom subject areas. Of course, it's understood that STEAM related classes can benefit by 3D. But, we'll go beyond these areas to explore ways to use 3D technologies in history, language arts and other non-STEAM subject areas.
CORE GOAL: ENHANCED OBSERVATIONAL SKILLS
Some people see and other SEE! Some people hear and others HEAR! While some of these differences might be genetic, every one of us can learn the skills that it takes to turn seeing into SEEING and hearing into HEARING.
When I taught science or drama to middle school students I knew that very few of them would become scientists or great actors. But, I knew that all of them could learn to see more of life around them and, in doing so, would grow to love science and/or appreciate the skills of a great film director. So, my primary focus was for them to learn the skill of observation. And, it worked just as I had hoped. The science students began paying attention to every detail of the simplest rock or leaf and the drama student's performances came alive with added nuances gleaned from closely observing mannerisms we usually fail to see.
The path from seeing to SEEING is not easy or instant. It's amazing how we resist real in depth observation. But, if mentors are patient and persistent, there comes a time when, like a light bulb, a switch is turn on and the value of the effort is fully realized. As a teacher, watching this transformation is probably our greatest reward.
So, the first goal of this blog is to explore ways 3D can encourage and enhance student's learning experience in ALL subject areas.
CORE GOAL: UNLOCK THE POTENTIAL OF AT-RISK STUDENTS
Up to the present, 3D technologies being used in schools have mostly been focused on the high-achiever. Printers are expensive, twitchy and slow. And, it is thought that serious 3D design applications are difficult to learn for both educator and students.
But, from my work with The YouthQuest Foundation, I know for a fact that learning 3D design and printing has had enormous benefits in the lives of the at-risk young people participating in the programs we serve. It is literally life changing.
I wish all at-risk students had access to 3D design applications and 3D printers. But, for a variety of factors this goal will be a long time coming. But, there are less expensive ways to use the power of 3D to teach life lessons to at-risk young people and we want to find and demonstrate them.
3D VISUALIZATION "POPS"!
Photographers sometimes use the term "Pops" to describe a particularly vivid photo. Here is an example.
3D can do the very thing when it comes to DETAILS. Nothing demonstrates this as well as Brian Valentine's (known as LordV) wonderful "cross-eye" photography. Before we had VR glasses, we had "cross-eye" photography. The photographer takes a picture and then moves slightly left or right to take another picture. They then combine the images side-by-side.
To see the resulting 3D image, the viewer focuses on the image while crossing their eyes. Some find easy and others cannot do it at all. But, for those that are successful, the 3D image suddenly pops into place and the added detail is absolutely stunning.
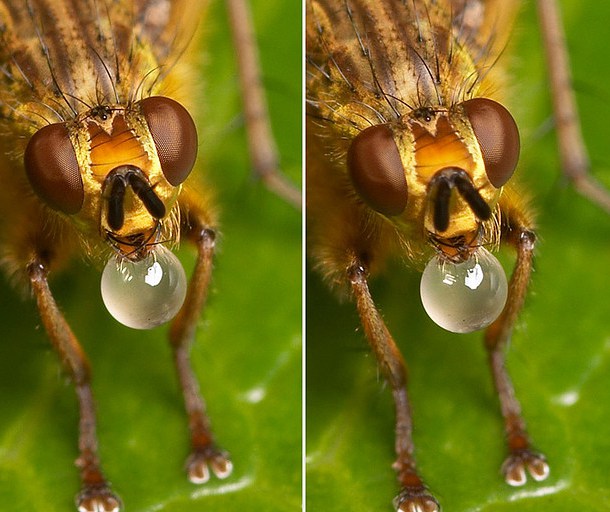 |
| Brian Valentine's Crossed Eye Photography |
https://www.flickr.com/photos/lordv/albums
If you had trouble getting the 3D effect, this tutorial may help. And, if you have a virtual reality headset that works with side-by-side images you can use those to view these 3D images. While 3D still imaging is powerful, it is just the tip of the 3D iceberg. There is a lot more to come.
EXPLORATION USING THE CAPPASITY PLATFORM
To begin our 3D visualization adventure, we have chosen to use a platform called Cappasity.
http://www.cappasity.com
While the best known application for using the Cappasity platform is to present products for sale, we are convinced that this powerful tool has an important place in enhancing the educational experience of our at-risk students.
This platform provides the means to present 3D content. It's purpose is to capture an object with a series of images that can be presented on two levels. The first level is full 360 degree rotation 3D visualization under the control of the viewer. Here is a page that presents some toys that can be rotated 360 degrees. Double Click on an image to zoom in and out.
https://cappasity.com/toysrus/
A gallery of images is available here.
https://cappasity.com/gallery/
The second level is as a VR, or Virtual Reality, experience.
It's obvious that the Cappasity platform is highly scalable. But, we'll start with the basics. And, that means learning how to capture for 360 rotation and for 3D printing. For this, we will be using two different programs developed by the Cappasity team. Only one of these programs can exist on a single computer, so which one you chose will depend on whether or not you have a compatible RealSense Depth scanner.
Easy 3D Scan
Easy 3D Scan captures 3D visualization content using video. If you have a compatible Canon SLR it will automatically drive the camera for the capture. But, video from just about any source can be used.
Currently, Easy 3D Scan does not capture objects to be printed on a 3D printer.
Easy 3D Scan for Intel RealSense
We have been using Sense and Intel RealSense depth cameras for some time with our 3D design and printing students.
While this progran is no longer being developed into the future, it is still currently available as a free download and is THE best software for capturing 3D objects with a RealSense depth camera that we have tested. We don't know how long this software will be available; but, while it is, we plan to make full use of it because it allows us to create 3D objects that can be printed as well as viewed.\
It earned its "Easy" name at the USA Science & Technology Festival where our at-risk students taught hundreds of children how to scan real objects into 3D images using the Sense2 Scanner and Cappasity!
 |
| Cadet Teaching Child 3D Scanning with Cappasity |
To summarize, what makes the Cappasity platform unique is that a variety of input sources can be used to create 3D visualizations. A series of still photographs or a video can be used to create 360-degree rotation visualizations. But, Cappasity can also create objects than be printed on a 3D printer using a RealSense based 3D scanner.
I'm really looking forward to this great new adventure!
Subscribe to:
Posts (Atom)