Showing posts with label Matter and Form. Show all posts

Thursday, February 27, 2020

Small Portable Lighting Made Big - OrangeMonkie Halo-Bar Lights.

I have been doing digital image product photography and VR (Virtual Reality) for more than 20 years.

One of the keys to successful product photography is using a large light source even with very small objects.  Here is a post where I discuss the benefits of large lighting with a fellow photographer, with examples, in 2013.

Color 3D Scanning is a form of photography in that in addition to the distance scanner a digital camera is used to capture the 'material' to be overlaid onto the shape.  It, too, can benefit from a large light source.  But, in most cases, especially when we want to go portable, that is not a viable option.  So, we must search for alternatives.

ORANGEMONKIE HALO-BAR LIGHTS

Let me begin by first saying this.  I love OrangeMonkie products.  In the 3D ThinkLink Lab we have 3 different sizes of Foldio lightboxes (Foldio1, Foldio2 and Foldio3) along with the marvelous Foldio360 turn table used to capture this 2300 year-old Apulian vase.


I became aquainted with the Halo-Bar lights because they were included with the Foldio3 with Foldio360 package.  At the time of that purchase they were only available with the Foldio3.  But, recently, they have been offered for sale at $59 as a standalone lighting package.

OrangeMonkie Halo-Bar Lighting Kit
The nice thing about these lights is that they come with a dimming system that allows very nice control.  This makes them very desirable even outside of the typical Foldio lightbox applications.   In fact, I've found them to be highly effective for with 3D scanners.  And, in particular, the Matter and Form scanner, which has become my favorite.

Halo-bar lights are small and portable, which adds to their value to be used with an equally portable 3D scanning system.  And, for most objects they work fine just as they are.  But, some highly specular objects present special lighting challenges requiring a bigger light footprint. 

Thus, began a quest to see if I could find a way to make some small portable lights perform like a MUCH bigger light source.

MAKING SMALL LIGHTS BIGGER

One of the benefits of being older is that memories of past solutions can be very helpful for the present.  In the late 1960's I sold audio-visual equipment and among the most popular items in the days of multi-projector slide presentations was the lenticular screen that was considerably brighter than the beaded projection screens of the time.  Remembering this, it seems like experimenting with lenticular lenses might provide the means for making a small light seem bigger.  Here is why.

 A LENTICULAR LENS is actually series of cylindrical lenses molded into a plastic sheet.  It looks like this when magnified.
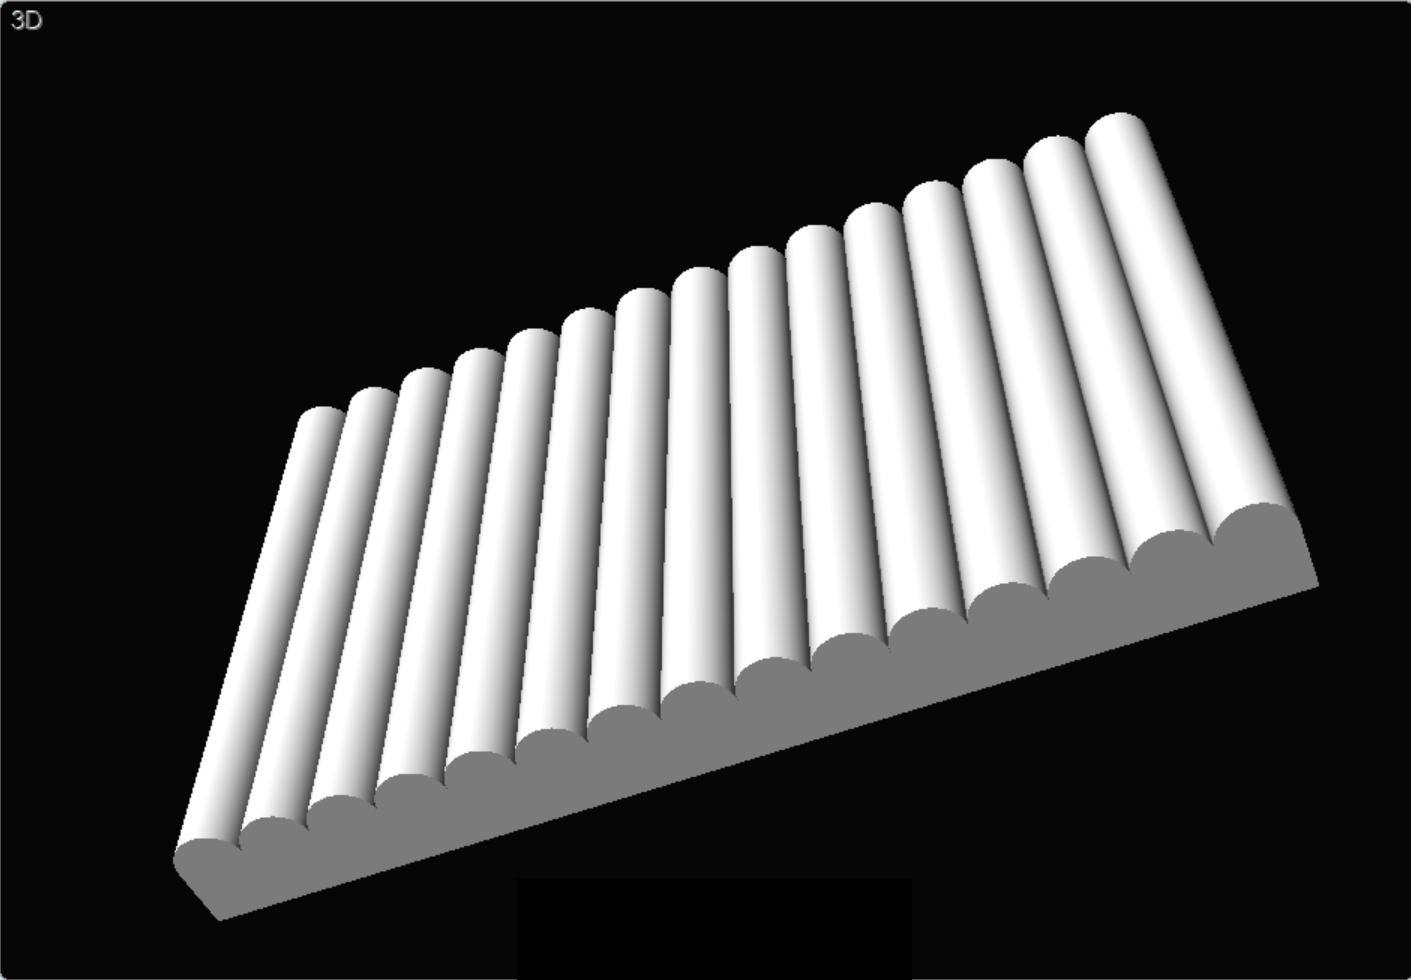
Illustration of a Lenticular Lens
 The purpose of the lenses is to redistribute the path of light waves as they pass through the lens in a controlled direction as in this illustration.

Altered Light Wave Pattern
In theory, I was hoping that the narrow light of the Halo-Bar would be broadened and flattened by a lenticular lens.  So, I decided it was worth spending some time to experiment.  I am happy to say it worked!

The orginal light pattern of the Halo-bar light looks like this:
OrangeMonkie Halo-Bar Light
The diffusion is actually quite effective just as it is.  But, it is still a small, somewhat concentrated light source.  Adding a lenticular lens in the vertical direction has this result.
Adding a Lentucular Lens Oriented Vertically
The moire pattern is due to the angle of my camera relative to the lens, so please ignore it.  The important thing to notice is that the narrow light is now MUCH wider!  But, we can do even better!
Adding a Second Lenticular lens in the Horizontal Orientation
We can add a SECOND lenticular lens that is rotated 90 degrees relative to the first.  This scatters the light resulting in a much smoother pattern!  How smooth largely depends on the distance of the light from the first lenticular lens.

We can smooth even further by adding a third diffusion layer.  In this case simple white paper.


As is evident, the final result is a light source that is much larger and smoother than the original.  The Matter and Form scanner for which this lighting modifier was created doesn't require a lot of light so the fact that the final result is not as bright as the original unfiltered Halo-Bar light is not a problem at all.

3D PRINTING AND THIS PROJECT

The 14"x20" lenticular sheets are available on Amazon. Five sheets are just under $25 with shipping.  The frame to build the diffusion system was created using Moment of Inspiration.  Basically, there is a top and bottom rail with slots that take the three levels of diffusion.  The image below shows the bottom rail frame and the legs that rails that raise the frame to the level of the rotating platform on the Matter and Form scanner.  The top rail mirrors the shape of the bottom and the sheets simply slide into the top and anchor in the bottom.

MOI3D Diffusion Frame Design
The reason for the curvature has to do with the fact that the Matter and Form scanner has a turntable.  I wanted a light source that wrapped around the rotating object.  It takes about 10 hours to complete all the 3D printed parts on a 220mm x 220mm printer.   The Halo-bar shape lends itself very well to 3D printed stands that are adaptable to any height.

3D Printed Halo-bar light stand
Halo-bar and Diffusion on Stands
I like the result so much that I have ordered two more Halo-Bar lights to see if I can improve the lighting even further from a 3rd direction (front). 

Matter and Form 3D Capture Screen Shot
 
Above is the first attempt to use the new diffusers.  We are getting there; but, more experimentation must be done.  But, for now, I can say that this has been a fascinating project and I have really enjoyed learning to use the lenticular material and adding that capability to our capture arsenal.


Tuesday, January 21, 2020

An Example of WHY Capturing is Important to History

As my first example of a classroom "Curated Virtual Museum Collection" I chose a series of objects that one can buy for less than $20.  They aren't all that expensive nor rare... for now.  Here is a sample.

Chienco Santa - Tobacco Tin circa 1980
The Matter and Form scanner did an excellent job of capturing this object with a single 'Quick Scan'.  The result will be even better when I add a second scan directed at capturing the top and bottom.  But, even if scanned flawlessly, the question remains.  Why pick this object as an example of preserving history.

The answer is TIME and LIGHT.  Right now we can find very nice examples of this object on eBay or Etsy.  But, like ALL things, time and light, have a way of taking away this luxury.  In fact, I have not one; but, TWO examples of the Santa.  They were probably created around the very same time.  However, today, just under 40 years later, they look VERY different.

Time and Lack of Care Ravage a Santa
It is obvious from this photo that the Santa on the right has been sitting in a well-lit spot over an extended period of time.  And, that leads us to believe that the Santa on the left could face that very same fate given enough time if not well protected.

The ratio of perfect examples as compared to less-than-perfect examples inevitably changes over time.  When they first came off the for there were more prefect than not.  But, as the years roll by there will eventually be more damaged than perfect.  In fact, the Santa on the left is actually LESS perfect now than when I first received it due to my carelessness.  There is a small dent near the bottom in the back caused by my picking it up by the head not realizing that the head slides off easily.

These objects represent the work of a company of around 600 people working at Cheinco, in the small town of Burlington, New Jersey.  (By the way, if you ever get by that way, the Burlington County Historical Society has some toys and other items created by Cheinco.)

It's hard to imagine that any company in the future would resume the production of tin objects like this when plastic is so prevalent and inexpensive.  Therefore, they represent a snapshot in time that will probably never exist again.

By scanning these objects in the best condition possible, as faithfully as possible, we can capture that history for others to see and appreciate in a very tangible way.  We can't duplicate the tin; but, we can duplicate the overall effect of the design on the tin and capture some of the documentation, such as the printing on the bottom that gives us some clues about the maker.

Perhaps, even immediately MORE importantly, the scanning and curation process encourages us to know more about the item, more about the company and more about the people that worked in that factory.  We are, in effect, also capturing a day in THEIR life.  And, that is very, very cool.

Should a descendent, long into the future, want to know more about what their ancestor did in 1980, the virtual museum exhibit will be there waiting for them long after ALL the tin objects have faded like Santa #2.

And, that is justification enough.  :)

P.S. If you clicked on any of the links in this page, you have experienced another benefit of our having selected the Cheinco tins as our example.  Would you really have visited the Cheino article, the Burlington, NJ pages or the Burlington County Historical site had we not written about our Santa?  Yes, it is true.  3D Motivates!

Friday, January 17, 2020

3D Scanning Workflow - Step #1: Material File Correction

A lot of users make the mistake of believing that the results they achieve from their color 3D scanner or photogrammetry applications a done deal.  It either worked as they hoped or it didn't.

Nothing could be farther from the truth.

There is a LOT that can be done with a capture that may seem unacceptable.  But, to turn that capture into some usable there may be a bit of processing that needs to be applied.  We're going to call this "The 3D Capture Workflow" and it will involve one or more post-processing steps.

While capture devices and software often allow several file types to be created, the most common from which to start is the Alias Wavefront Object or .OBJ file type.  The primary saved file will often have one or more child files, usually .MTL and .JPG (or .PNG).

ALIAS WAVEFRONT OBJECT FILE (.OBJ)


We usually open an .OBJ file in a 3D viewer application.   The result is something like this... a color 3D object that can be rotated or viewed from all sides.


Santa Capture Viewed in Meshlab

But, the .OBJ file is actually a text document that can be opened in any text editor.  It primarily contains all of the "Vertex Position" data which defines the underlying SHAPE of the captured object.  And, it also contains a pointer to the MESH MATERIAL file. Here are the first few lines of our sample .OBJ file.
# File produced by Open Asset Import Library (http://www.assimp.sf.net)
# (assimp v4.1.0)

mtllib SantaTest01.mtl

# 57085 vertex positions
v  -6.74224853515625 52.62289428710938 -80.77588653564453
v  -6.03680419921875 52.62289428710938 -80.8377685546875
v .....
In this case the child material file is called "SantaTest01.mtl".   Let's take a look at that file.

MESH MATERIAL DEFINITION FILE (.MTL)

Like the .OBJ file, the .MTL file is a text file.  It's basic purpose is to point to one or more image files that define the color information that provides the object with a color surface.
# File produced by Open Asset Import Library (http://www.assimp.sf.net)
# (assimp v4.1.0)

newmtl SantaTest01_material
illum 1
map_Kd SantaTest01.jpg
In this case, there is only one child image file that is called "SantaTest01.jpg".  It is this file that we will be focusing on for the first step of our post-processing workflow.

COLOR MESH MAP FILE (.JPG)

What provides the color detail of our 3D object is actually a flat image file.  Before viewing the .JPG, let's revisit our capture from a different angle.

Santa Capture - Back View
While generally this capture would be acceptable, it is not perfect and can be improved with just a little work on our part.   There are two issues.  The first, as pointed out by the blue arrow is that this tin object is highly reflective.  Normally, this could be solved by spraying an anti-glare material on the object.  But, our goal is to work with objects of some historical value and there is no way a museum is ever going to let us spray one of their historic objects even if it means a better capture outcome.  We will simply have to learn how to deal with specular issues some other way.

The other issue, as pointed out by the green arrow, is that is a seam in an area where there is no such seam in the original object.  while not a 'show stopper', if we can learn how to diminish the affect of that seam, we can obtain a better final result.

To understand and fix (or at least improve) both of these issues, let's turn to the Mesh Map file... SantaTest01.jpg.

SantaTest01.jpg Mesh Map File
As is plain to see, the surface of the Santa capture is defined by SIX individual sections within one .JPG file.  It becomes obvious that where two of these overlap there is some discrepancy in the brightness that results in the seam we see.  And, it's also apparent that if we are to reduce the specular issues we need to address several places in this image.  Once these are addressed, we should see an improvement in the final 3D object.

AFFINITY PHOTO / AFFINITY DESIGNER

Any image processing application could be used.  But, I have chosen to use Affinity Photo for this purpose.  The reason for choosing this application is two-fold.  First, it is VERY reasonable in cost... just $49.99.   And, it is amazingly complete is terms of matching the much more expensive Adobe Photoshop.   Secondly, while I am a complete novice at using Affinity Photo, I have found some amazingly easy lessons that should let me get up to speed enough at least well enough to improve this image and, consequently, improve the overall result of the capture.

The Affinity team has create a number of great free tutorials available on their web site and/or YouTube. But, the training potential also extends to 3rd party experts like Ally and Ezra Anderson of Affinity Revolution training company.

AFFINITY REVOLUTION TRAINING COURSES

Affinity Revolution has a number of terrific free training videos on their YouTube channel.  I have seen enough to believe that, using their training, I will be able to become proficient enough to be able to significantly improve any capture.

Yes, I realize revealing my ignorance in product that I intend to rely on not only for myself; but, others, may be more than a bit foolish.  So, let me explain how I came to this place.  While I started out, decades ago, as an Adobe user, I was never really a fan.  When I came upon an image application called PhotoImpact, I immediately adopted it as my goto image processing program.

Unfortunately, Ulead, the original company that produced PhotoImpact went out of business and sold the rights to Corel who has never updated the product and it became simply too buggy in the new operating versions to remain with it.  I have tried many other candidates over the last ten years and none of them were impressive enough to make the switch until I recently found Affinity.

So, it's not as if I am starting from scratch.  I know what has to be done.  I simply have to become familiar with the ways Affinity offers to do it.  And, I am confident enough in the training options available that sooner (I hope) or later I can fix the above image enough to be able to point out how to do so to those wanting to fix their own captures.

The positive thing is that if it turns out to be SOONER, rather than LATER, you should be convinced that Affinity products (either Affinity Photo or Affinity Designer) can do the same for you.  It's a gamble that I find worth taking.  So, I plan on seeing a lot of Ally or Ezra over the next few days.


The other positive I hope that comes from revealing my 'newbie' status with Affinity is that everyone that reads this will understand that at some point in our journey ALL of use are 'newbies' and especially if we have any sense of adventure and/or curiosity in trying to better our lives and find new tools.  The fun is in seeing how fast we can leave our 'newbie' status behind us to become as proficient as we have to be in order to accomplish our goals.

Let the adventure begin!


Tuesday, December 10, 2019

This is My Kind of Teacher!

I posted a review on Amazon for the Matter and Form 3D scanner and decided to see what others had to say about it. I was extremely pleased by one review in particular.  What struck me was not the high marks in the review. It was why this particular teacher wanted a scanner in the first place!  And, how they have expanded their vision to include other teachers.

I have no idea who this teacher is or where they teach.  But, whoever they are.. they have my undying respect!  They "Get it!"  I hope, some day, to get to know them personally.


H.S.A
March 25, 2019

First off, I want to say I love this scanner. As a social studies teacher, I’ve been working to integrate my curriculum with STEAM (as opposed to STEM) concepts, and I wanted a tool that would help students maximize cross-disciplinary learning. For example, if I’m teaching about Roman Empire architecture, instead of having kids throw a poster together, or build an arch bridge out of balsa wood, I can use this scanner to get them involved with a real tech-tool (that’s actually used by Industrial Designers and engineers) which they can use in conjunction with a 3D printer (and/or, as I found out, with Photoshop). That way we can bring history into the science room, and vice-versa. (I can also share this scanner with the art teacher, science teacher, and anyone else who can find an application to maximize cross-departmental collaboration.)

Second – I do want to note that it takes a little practice to get down a good method for scanning. Once you get the concepts, tips and tricks down (how to properly set the laser for good geometry capture, how to clean and combine scans, etc), it’s easy to get great results. Even though that stuff is in the manual, Matter & Form offers live tutorials (I’ve never encountered another company that does this) which is perfect for people like me who aren’t big “user manual guys”. Getting personally walked through a couple things was a big help. (I highly encourage M&F
to pop up a couple videos on the nuances.)

So, all in all, it’s a great piece of equipment, and has really helped bring other disciplines into my classroom. Students LOVE working with it, and I get to bring my pedagogy into the 21st century. Thanks, M&F!

Saturday, December 7, 2019

Helping Teachers and Students to Obtain The Optimal Capture Results

While we have not been actively creating daily posts about capturing historic objects to create virtual museums, it does not mean that we have not been VERY active in moving this concept forward.  Behind the scene we have been and are laying the groundwork to be the most helpful we can be to teachers and educators that would like to do exactly what John Zingale has done at iTech and we have done at YouthQuest Foiundation.

There is no one-size-fits-all magic bullet when it comes to capturing objects in 3D.  Some things capture well using a handheld 3D scanner.  But, others do not.  They are captured best using photogrammetry.  Therefore, teachers and students might find that they need more than one tool to accomplish the task.

And, coming up with the best possible results does not always rely on the scanning device or the photogrammetry device being used.  The type of platform or the color of the platform on which an item is placed might make quite a difference in the outcome.  How we handle lighting is also an important factor.

And, finally, the tools we apply to the original scan to come up with a completely finished virtual object can make a tremendous difference in the final outcome.

It all sounds so complicated.  But, it is not.

Knowing a few simple tricks that apply to the combination of each individual capture device, shooting platform and lighting requirements can help immensely.  And we have been devoting a lot of time, energy and thought about how to present those tricks in an organized and helpful way.

THE STRATEGY: DYNAMIC ONLINE COURSEWARE

By "Dynamic" I mean a low cost, lifetime, online course (Under $20) that is expanded, at no additional cost to a subscriber, as developments warrant and the means and capabilities of our being able of doing so are available.

A lesson will be created for each capture device or application along with tools that enhance that device's capabilities in positive ways.  These lessons will NOT be reviews.  Whatever the capabilities or limitations of any given device might be, we will address how to capitalize on the capabilities and, as much as possible, overcome the limitations.  We do this because we know teachers aren't always in control of the buying process.  They are simply provided with the device and must make do with what is at hand.

When it comes to creating 3D capture opportunities for deeper student engagement with history, any capture technique or device is way more useful than no technique or device.   The key is to get the most out of whatever tools we have.

INITIAL LESSONS

The initial lessons will follow two tracks, 3D scanners that have been on the market for a while and no-cost or low-cost photogrammetry applications for smart phones and computers.  The 3D scanners to be presented will include standalone devices like the Matter and Form scanner.

Matter and Form Scanner
And, well-known hand-held scanners like the Sense1, Sense2 and xyzPrinting scanner along with their RealSense counterparts.
Sense1 or Sense2 Handheld scanner
xyzPrinting 3D Scanner
With each of these devices we will also cover additional tools, like 3D printed parts that allow better mounting or operation,  And we will include various scanning platforms and lighting devices or techniques that enhance their capabilities.  These might include both manual and programmable turntables.  Anything that we find provides the best result.

HAVING REALISTIC EXPECTATIONS

None of the scanners and/or photogrammetry tools will ever deliver results comparable to $35,000 scanning devices.  But, they don't cost $35,000 either!  Nothing will discourage you or your students more than having unrealistic expectations for any of these devices and applications.  The xyzPrinting scanner has limited resolution; but, it is also one of the easiest to use for a complete beginner.  This make it very useful for learning the skills required for using ANY 3D scanning device. 

The Matter and Form scanner has limitations as to the size of object it can scan.  But, it is a WONDERFUL device for creating virtual museum objects that fit into its scanning parameters.  The ability it provides to quickly and easily combine multiple scans into a single result is pretty amazing.

Our focus is on moving forward and getting better with whatever device you happen to be able to obtain.  It is the process of evaluating, researching, planning and capturing that provides a rich learning experience no matter what the tool.